Basic Things to know about React Component

Basic Things to know about React Component

Introduction to React Component

  • A react application is built with a set of components.Components are the fundamental units of a react application.Each component has its own element in the DOM. 
  • Components are known for rendering the content for that element and also handle events. Components can be nested within each another.

1) Defining a Component
The top level namespace for react is "React".We use the createClass function in order to create a new component

var firstComponent =React.createClass({
        render:function(){
              return  <div>
                                <h1>Hello {this.props.name}</h1>
                          </div>
             }
      });

The html syntax will be converted into plain javascript.The JSX in the return will be converted like the below code

return React.DOM.div(null,
                      React.DOM.h1(
                                      null, 'Hello" , this.props.name)
                                     );

2) Rendering a Component
So , What is rendering a component?
Whenever we are rendering a component, it means we are linking it to a DOM element.

React.render(
     <Hello name={"world"}/>,
     document.getElementById('app')
);


Note:Render function can return a single react component.

3) Props

Props are immutable values that a react component uses to render.These are supplied as XML attributes in the JSX  syntax.
In the example below Hello is the name of the component and we are supplying a value of name in the java script expression syntax.
React.render(
     <Hello name={"world"}/>,
     document.getElementById('app')
);


This name can be accessed by using  props.name

4) State
When a component needs to be changed and the cause of it is the component's parent ,then the parent can just change the child props and re-render.
If the component needs to change due to some event , then the component needs to use state.
Inclusion of state in the component increases the complexity of the component, so it's better to avoid the usage of state whenever possible.
Always store state in the upper level and send them to the lower ones.

getInitialState:
getInitialState allows a component to populate it's initial State.
When a component is first mounted , we need to initialize the state of the component for rendering.This is possible with getInitialState, as getInitialState initializes the state value by returning an object.

getInitialState:function(){
           return {value:3};
}

The value can be accessed as {this.state.value}

setState:
setState is used to update the state of the component. setState merges the new state with the old state.The setState keeps track of the old state unless its overridden

5)Props

getDefaultProps:
getDefaultProps is used to specify the values , if they are not explicitly provided.
We can give values in two ways
1) With Attributes
2)With getDefaultProps

getDefaultProps(){
     return{
                  a:1,
                  b:10
          };
}
propTypes:
propTypes is used for validation purpose.
     propTypes:{
            name:React.propTypes.string
               }
Here we are setting the type of "name" as string.In thr below example we are making it required.

 propTypes:{
            name:React.propTypes.string.isRequired
               }


What is virtual Dom in React Js


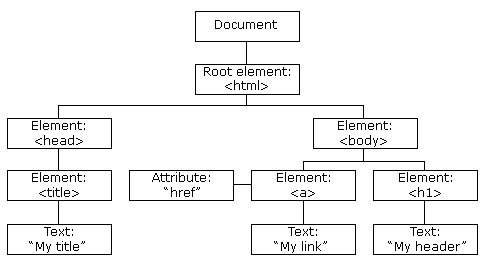
Before Knowing about Virtual DOM, lets first discuss about DOM. DOM is document object model which is in the structure of  tree.
Every html page we write will be converted into DOM internally which looks something like below


What comes next in the page will be clearly been set on the DOM once an HTML page is created.When there is any change in the page, the whole DOM gets manipulated in order to update the changes in the page.
now,

What is virtual DOM.

React would create an exact copy of the DOM which is already been created which is the virtual DOM. Whenever there are any changes in the DOM , react checks whether both the DOM are being matched.

Now the copy of the actual DOM is not matching with the actual DOM. The mismatched part will only be updated instead of updating the whole DOM. Thus react helps us in solving the expensive DOM manipulation problem by using the concept of virtual DOM.

React syntax highlighting for SUBLIME


Generally ES6 syntax is not recognized by the sublime editor.In order to make it recognize we need to install babel package for sublime

In order to have your syntax get highlighted in sublime, follow the below instructions

Installing Babel package for sublime

1) Go to sublime editor and go to preferences on the top bar


2) In preferences select package control

3) In package control type install package

4) Find babel in the available packages and select it

Then in order to apply it to the syntax , we need to follow few more steps

Using Babel package to highlight the syntax

Go to view-> syntax -> Babel in sublime to order to apply the highlighting to all the syntax written in ES6

Now , we have the ES6 syntax being highlighted in sublime

React Js Environment Setup step by step

React js hello World Program


Here is a step by step approach with explanation of how to set up react environment

Prerequisites:

1) Node  
Node Installation Process- Install node in your machine simply by downloading it from
https://nodejs.org/en/download/.


This screen appears , then click the file according to your system requirements.
Once installed you may check in the command prompt by typing

npm -v and node -v 


If node is successfully installed on your machine, we are good to move forward to set up our react environment.

React js environment setup step by step

1)Creating folder
 Create folder and name it ReactJs and press shift+right click , then select command prompt from the options

2) Creating package.json
type in the command prompt the below code
npm init 

npm init creates a package.json for your application.It prompts to enter the feilds to be stored in package.json
you can just press enter untill the whole package gets created.Your package.json will look something like the below


Note:
Never name your folder as react as mentioned above.By doing so,  you will get errors during react installation.

3)Installing Webpack
In order to install webpack , type the below code

npm install webpack webpack-dev-server --save-dev

4) Installing react

In order to install react, type the below code

npm install react react-dom --save

5)Installing Babel

In order to install babel, type the below code

npm install babel-core babel-loader babel-presets-es2015 babel-preset-react --save-dev

6)Other files
After following these 5 steps you will find node_modules  and package.json in your folder.Then create the following files in your folder

  • index.html
  • script.js
  • webpack.config.js

Now your folder  will look like below, this is not a recommended folder structure but to create a basic app the following folder structure is enough as it will be simple to understand.


7) Webpack.config.js

Copy and paste the below code in webpack.config.js

var path=require('path');
module.exports={
entry:'./script.js',
output:{
path:path.resolve(__dirname),
filename:'bundle.js'
},
module:{
loaders:[
{
test:/\.js$/,
loader:'babel-loader',
exclude:'/node_modules/',
query:{
presets:['es2015','react']
}

}
]
}

}

8)Index.html

Copy and paste the below code in index.html

<!DOCTYPE html>
<html>
<head>
<title>React</title>
</head>
<body>
<div id="firstapp"></div>
<script src="bundle.js"></script>

</body>

</html>

9) script.js

Copy and paste the below code in script.js

import React from 'react';
import ReactDom from 'react-dom';


ReactDom.render(
<h1>Hello World</h1>,
document.getElementById('firstapp')

);


Then type the below code on the command line

npm run server

The following appears , mentioning that project is running at http://localhost:8080/


Open browser and goto http://localhost:8080/.You will find your first hello World program in react.

Refusing to install react as a dependency of itself - React installation error

In order to set up we use the command

npm install react react-dom --save


And the if error Refusing to install react as a dependency of itself occurs, don't worry it's a simple issue 

this happens when the name of your current directory is react or when name attribute in your package.json is react.


Change the name attribute in package.json to any other name
And your issue gets solved


React and ReactDom gets successfully installed.

Summary:
Never name your folder which your using as react while developing a react application

3) Creating a basic component in React JS


Components are the most important part of react js.There are two ways to create a component
1)Component with functions
2) Component with class
Here is a detailed explanation of when to use function components and when to use class component.
A) Creating component with functions
 Here are the steps to  create component with functions
1) Create a function and  send a parameter props to it, props is an object that holds all the values that were passed when the component was rendered.
2) return the JSX which is supposed to be visible on the page.
2) In order to make the view visible , we need to render it using the statement
ReactDOM.render
3) ReactDOM render takes two parameters
   a) name of the component
   b) Where the component should be visible

Here is an example of how a basic component in react should be written

Basic Component example using simple function :

const Button = function (props){
return (
<button>{props.label}</button>
)
};
ReactDOM.render(<Button label="Submit"/>,mountNode);
          
  • The code which we are returning is not html and is jsx which will be compiled into java script
  • As "props" holds all the values that were passed when the component was rendered, we can access the label of the button with props.label 
  • The syntax to mount component in the browser is 
               ReactDom.render(<Button/>,mountNode);

As mentioned , The first argument is the component you want to render.
The second argument is the element in which the component should be rendered.Here we used mountNode which is a predefined element which displays everything inside it on the browser.

Basic component example using arrow functions:

const Button = (props) =>{
return(
    <button>Submit</button>
    );
};

ReactDOM.render(<button/>,mountNode);

B) Creating component with class

When ever we want the state of the component to be changed on adding any event Handlers , we need to re- render the component.
In above example our button is a property and we cannot change properties using function components because component properties are immutable.
The reason why  function components are immutable is that they  do not have a state.To have state , we should use class components and not function components.

 Here are the steps to  create component with classes
1) We can either use React.createClass or a class which extends React.Component
2) Add a state property in order to make changes to our component
3) Instead of directly returning the JSX code, here we will place it inside our render method
4) Any event handling methods can be wriiten inside the class itself or inside the constructor.
5) Render the component using
ReactDOM.render()


Basic component example using classes 
Title:  increment counter value on button click

class Button extends React.Component {
    //state={counter:0};
    constructor(props) {
        super(props);
        this.state = {
            counter: 0
        };
        this.handleClick = () => {
            this.setState((prevState) => {
                return {
                    counter: prevState.counter + 1
                };
            });
        }
    }


    render() {
        return ( <
            button onClick = {
                this.handleClick
            } > {
                this.state.counter
            } < /button>
        )
    };
}

ReactDOM.render( < Button / > , mountNode);

setState method in react
The setState method is a built in method in react which is available on every class component instance to update a component state.The setState code can simply be written like below

handleClick=()=>{
this.setState({
counter:this.state.counter+1
})
}

setState is an asynchronous method and when setState is called multiple times the update cycle will overwrite the previous updates, as a result , the previous changes are lost.
We have an alternative solution for this problem,instead of giving it to the new state directly,we can give it to a function which transforms the current state and props into a new state as below

this.setState((prevState) => {
                return {
                    counter: prevState.counter + 1
                };
            });
Here we are using setState as a function instead of an object which solves the problem.The function receives a prevState object and we can use it without worrying about any issue. By doing so , the function returns the correct value which we need.

Summary:

1) Whenever there is a change in state in the component we are building , we cannot use function components and should use class components.

2)In order to use the state object , we need to initialize it. We can initialize a state object either in the constructor or in the class

3) The super(props) statement used in the class is to support inheritance and make the component available to use it anywhere else in the application.

4) Use set state method to change the component.Use setState as a function as it is asynchronous


Creating a component by combing two components

Here is an example of combing two components.Here we have created two components namely result and Button.
Button component is to make the click function work , which increments  the counter
Result component is to display the value of the counter.
A component can access its own functions actions and state, to access other class functions we need to use props.

class Button extends React.Component{
// super(props);
handleClick=()=>{
this.props.onClickFunction(this.props.incrementValue);
 };
render(){//returns components jsx
return(
<button onClick={this.handleClick}>
+{this.props.incrementValue}
</button>
     );
   }
}
const Result= (props)=>{
return(
<div>{props.counter}</div>
);
};

class App extends React.Component{
state={counter:0};
incrementCounter=(incrementValue)=>{
this.setState((prevState)=>({
  counter:prevState.counter +incrementValue
})
)
};
render(){
return (
<div>
    <Button incrementValue={1} onClickFunction={this.incrementCounter}/>
    <Button incrementValue={5} onClickFunction={this.incrementCounter}/>
    <Button incrementValue={10} onClickFunction={this.incrementCounter}/>
    <Button incrementValue={100} onClickFunction={this.incrementCounter}/>
    <Result counter={this.state.counter}/>
  </div>
)
 }
}

ReactDOM.render(<App/>,mountNode);


2) What are Components and types of components in React Js


Components is the most important concept in React. Component is just a part of a web page , which can be reused anywhere in the application.

React components can be of two types:
1) Function Component (State less)
2) Class Component (State full)

Before directly going into the technical terms and the coding part lets first understand what is state full and state less

What is state full and state less 
A state full process keeps track of the state whenever there is a change in page.Let's consider example of gmail.
As soon as we login , we perform many actions.We never see the page refreshing every time , when we click on an action.
If we are composing a mail , and then clicked on the sent mail.Gmail still keeps track of the state and lets you perform other actions.It would be quite annoying If gmail wouldn't save the state and refreshes the page each time we click on a new action.So this is state full.
State less is just opposite of that , which doesn't store the state.

Frameworks like angular implements two way data binding in order to implement state full process.It always watches for changes in DOM and then updates the model. Two way data binding makes the process complex and sometimes even confusing.
React js uses one way data binding can be quite advantageous as it reduces the complexity and makes the implementation simple.

Now as we have little knowledge of what state full and stateless is lets move forward and understand how they are written

Function Components 
Function components are associated with presentation.They are the simplest form of react component

const firstComponent = (props) => {
return (
           <elementOrComponent/>
      );
}

The function receives an object of properties mentioned as "props "  and return react elements which describes what should appear on the screen.To understand better the above code is just like the below function.


function firstComponent(props) {
  return <h1>Hello, {props.name}</h1>;
}

The content in the return statement is not HTML but it is a special java script syntax known as JSX.

What is JSX?
 JSX is just the addition of XML syntax to javascript.
Just like XML,  JSX also has tag names , attribute names and children.


Class components
A function component or a class component is just the same in react's point of view.
A class component is a more featured way to define component in react.It acts like a function that receives props and also considers a private internal state as additional input that controls the returned JSX.

class Welcome extends React.Component {
  render() {
    return <h1>Hello, {this.props.name}</h1>;
  }
}


This private internal state gives react the " reactive nature".


What is reactive nature of react?                                                                                                         When the state of a component changes , those changes needs to be reflected. Here in react when we write html components , we need not worry of regenerating HTML for the browser's DOM. React will simply react to changes and will update the view as required.  

The difference between state and props is that "state" can be changed but "props" are all fixed values.Class components can only change their internal state but not their properties.

Virtual DOM and JSX

It is not necessary to create react component with JSX .Whenever we are writing JSX , we are indirectly writing React.createElement(component, props, ...children) function.

example:

<MyButton color="blue" shadowSize={2}> Click Me </MyButton>

compiles into

React.createElement( MyButton, {color: 'blue', shadowSize: 2}, 'Click Me' )

JSX gets compiled into pure java script and then works with the compiled javascript in the browser. The compiled part is the java Script representation of the DOM which react then translates into DOM operation.
Creating a component will be mentioned in the next article

Summary

  • State full keeps track of state and stateless doesn't
  • Function components cannot have state whereas class components have state.
  • Whenever we are writing in JSX we are internally writing  React.createElement(component, props, ...children) function.